Showing posts with label Scrapbooking. Show all posts

SU Scrapbooking Virtual Retreat


Introducing the Virtual Album Retreat, a brand-new event that’s unlike anything we’ve ever done before! 
 
During this three-day, virtual event, you’ll create 12 scrapbook spreads using the Month by Month Album Retreat 2025 kit, craft with SU crafters who love scrapbooking, learn new techniques, and connect on a personal level with fellow crafters and Stampin’ Up! staff. 


Month by Month Album Retreat 2025 Kit
 
To make the 12-spread album, you’ll want to purchase the Month by Month Album Retreat 2025 kit. Everyone who purchases a kit will receive an email in early July with a link to the exclusive Facebook page where the live event will stream.
There are only a limited number of kits, so make sure to order yours ASAP when the ordering period begins on 28 May!
 
Contact me for any details xx


Scrappin Inspiration

Oh my goodness.  That's all I can say, after what has to be one of my most busiest weekends EVER!!  And it was mainly about my kids.  All three of my kids who seem to have a busier social and sporting life then me.  Although I not really complaining as I was so lucky to see my wonderful friends over the weekend too.  Sadly no time for creating, so I come today with an inspiration project just for you, from my Stampin' Up! page!

It's a really cute 8" x 8" page that you could take to the next level with a 12" x 12" page!  Even I can made this one (and I'm not a scrapper)!!  So here's what was used for this project:

Stamps: Chock-Full of Cheer
Papers: Real Red, Whisper White Cardstock, Neutrals DSP Stack, Polka Dot Parade DSP & Silver Glimmer Paper
Inks:  Basic Gray, Marina Mist & Real Red Classic Stampin’ Pad, Marina Mist Refill
Stampin’ Up! Accessories: Rhinestone Basic Jewels, 1/2" Circle Punch, 3/4" Circle Punch
Big Shot: Big Shot, Snow Flurry Bigz™ Die* & Typeset Alphabet Bigz Die

*From the 2012-2013 holiday catalogue 


 So for more inspirational projects, why not check my page - there will always be something to tempt!

Cherish Layout

Ta dah!! Here is the finished layout.  Sadly I just couldn't get the lighting to work for me today.  But these pictures will give you an idea of how sweet the finished page looks.


Of course, yesterday's layout is still the feature of this 12" x 12" page.  I have just added a few more details to lift the page up!

 
I have used a 12" x 12" piece of textured Soft Suede CS (love the textured look) as my base.  I have then used a piece of Very Vanilla CS which I have punched with the Eyelet border punch.  I have given it some very light sponging with Soft Suede ink and pleated the edges to put under my original layout.  I have added a strip of the speciality Mocha DSP which matched perfectly!!


I have adhered some punched flowers onto the left bottom corner and highlighted with pearls.  I've also added pearls to the top right hand corner.  To finish off, I recycled the Cherish piece with the library clip from another project that was starting to look a bit sorry for itself.  Much better as my 'journal' bit on this layout!!

All I can say is, this page looks much better in real life!!

Making flowers

I've been working on a little project for the last few weeks.  The project was two-fold, it involved a scrap layout for me (shock horror) and a new technique for my Stampin' Up! team called the Avid Inkers.  Here's your first peek:


 I've been making 3D flowers.  The perfect embellishment!  But I couldn't share until after last night's meeting!  For the girls that couldn't attend last night, I'm sorry if it ruins the surprise but you'll get personal instruction from me!!


The flower has quite a bit of bulk but in real life it's so pretty.  It was the perfect flower to add to my layout!!


I have the most beautiful photos of Jess' Christening last year, which just had to be shown.  I wanted to keep the layout classic and simple, but with a hint of feminine touch!


As I really struggle with scrapbooking, I decided to do my layout in chunks.  I have used an 8" x 8" square of Soft Suede cardstock as my base and took it from there.  I've die cut the doily from Very Vanilla and the border from Early Espresso.  I've just realised I haven't got a photo of the finished 12" x 12" page.  I'll be back tomorrow to share that one!!

But I have to say, I'm really really happy with this layout.  Just saying :)

Scrapping News!!

Well, you're just not going to believe this one.  I've been doing scrapbooking.  Seriously.  Me!  Scrapbooking is something I find incredibly difficult and I usually just watch in admiration of all the beautiful scrap pages out there.  But maybe having a cute photo or starting with a smaller layout might just be the key I need!


I love the bright colours in this layout which features the 'Under the Big Top' stamp set.  It just helps that my big boy Luke is wearing the right shade of red!!


I love the little banner strung over the photo and the little flags.  They really match the layout.  And there is even texture on them using my beloved Big Shot!

So stay tuned over the next few weeks, I have lots of scrap layouts to share!!

Reason to Smile - last days


Eek!! The month of June is going by way too fast (I should know as it's almost my birthday) and that means it's the end of the fabulous Reason to Smile promotion.  Where you can reward yourself with a FREE stamp set or purchase the Reason to Smile for a fabulous price.  Need some inspiration why you just have to have the set?  Well here you go:

Happy Birthday Wishes gift bag

Stamps:  Petite Pairs, Reason to Smile*
Papers: Daffodil Delight, Rose Red, Whisper White Card Stock & Window Sheets
Inks: Early Espresso, Pretty in Pink, Rose Red Classic Stampin’ Pad® & White StazOn Ink Pad
Accessories: Daffodil Delight 1/8" Taffeta Ribbon, White Baker’s Twine, Bitty Buttons, Stampin’ Dimensionals®, 1/2" Circle Punch, 1-3/4" Scallop Circle Punch, Big Shot™,Fancy Favor Bigz™ XL Die & Labels Collection Framelits
 

‘E’ scrapbook page (8" x 8")

Stamps: Letter It & Reason to Smile*
Papers: Baja Breeze, Island Indigo, Whisper White & Wild Wasabi Card Stock
Inks: Baja Breeze, Island Indigo, Wild Wasabi Classic Stampin’ Pad®,  Baja Breeze & Basic GrayStampin’ Write® Marker
Accessories: White Baker’s Twine, Neutrals Designer Buttons, Scallop Edge Punch

Dream card (4" x 4")

Stamps: Loving Thoughts & Reason to Smile*
Papers: Whisper White Card Stock & Wild Wasabi Card Stock
Inks: Certainly Celery, Pretty in Pink & Wild Wasabi Classic Stampin’ Pad®
Accessories: White Baker’s Twine & Dotted Scallop Ribbon Punch
 
So to recap, this fabulous offer runs out on 30 June 2012.  To get your hands on this great little stamp set, contact me ASAP!!  For more inspiration and ideas, head on over to my Stampin' Up! website.  You'll find yourself fabulously inspired!!
 
*Get this exclusive set FREE with a $125  purchase—only available through 30 June 2012! 

Reach for the Stars

During our recent school holidays, I had the opportunity to enjoy some quality time with my eldest son while the two little ones were at childcare.  We picked something to do each morning and then had the afternoon to relax.  Floriade, hire movies and bowling were the winning activities.  So for the first time in ages, I got to enjoy some scrapbooking time while I wasn't studying!!

I had a picture of my little man Matthew that was just begging for some improvement.  He looked gorgeous :) in the photo but the actual photo background was just bland.  So this is what I did:

I used lots of star punchies, star stamps and bling for this layout.  How could you not!!  I even added some gold thread wrapping to some of the stars which turned out really cool and it was an idea all my own so I'm very proud of that!  I've used the colours Concord Crush, Early Espresso, Daffodil Delight and Cool Caribbean (retired) for my colours. 


Matthew keeps walking around the house showing everyone this page, he doesn't want it in an album!  I think I might have to make him one to put in a little frame!

Scrap Class @ Home is here!

It's been a little while (Okay a long while) since I've offered Scrap @ Home classes, but they're back.  Just like the Stamp @ Home classes, you'll receive enough supplies to make a double scrap layout.  I'll provide the instructions for the first page leaving you with enough supplies to make a second page to match!

This month's Scrap Class @ Home uses the Snow Swirled Stamp Set.  Available in two colour ways!


July 2011 - Snow Swirled Christmas in July!


Snow Swirled, perfect for Christmas in July.  
Take a 6" x 6" scrap layout and step it up to a A4 size layout and finally to a 12" x 12" layout.  This technique is perfect for layouts for beginners as well as those with a bit more experience.  Available in two colour ways - Jolly Holly using Cherry Cobbler, Old Olive, Early Espresso, Baja Breeze and Very Vanilla) or Holiday Treasures (retired DSP from 2010) using Ruby Red, Old Olive, Baja Breeze, Chocolate Chip & Whisper White.

Some Scrap Pages

My 2010 New Years resolution was to create a double scrap layout each month.  But like all new year resolutions they kind of started well and then landed in a heap.  I did try and I do hope to try again next year (2011 is not that far away you know!!).  So at our Scrap n Chat nights, I'm gonna spend more time scrapping and less time chatting (LOL!!).  Maybe that could be my next resolution, less chatting!!!  My sons will be amazed!

Last Friday night, I made a double layout using the reinkers and mini-misters as well as stamps and punches.  A sneak peak was revealed with my Sympathy Card post the other day.  Here are my pages I've now added to my album:


I will try to explain in a few words what we did!!  Firstly, we punched butterflies from scrap cardstock and using temporary adhesive, we scattered them over the our 12" x 12" cardstock pieces.  We sprayed a mix of water and reinkers over our pages and also over the butterflies.  We also did this to another piece of cardstock (about half a page this time).  I used 6 drops of Buckaroo Blue (retired) with the mini-mister filled with water.  While it was drying, we created the photo mats.  When dry, remove the butterflies.

With Basic Grey ink, we then stamped a flourish image over the cardstock, kind of being selective where we stamped and then sponged the edges with the same colour ink.  We did the same with the spare piece of cardstock, although we used Basic Black and then punched some butterflies from it.  Interestingly the Basic Black ink colour didn't fare as well as the Basic Grey and 'ran' creating a gorgeous purple colour.  The butterfly wings were jazzed up with glitter and randomly adhered to the page.

With a little bit of journalling, some titles and gold brads, the pages were finished.  I also added gold hinge thingies (not sure what they're called) to a few of the corners for interest.

Here's what I used:

Stamps: Heard from the Heart & Flourish (non-su)
Inks: Buckaroo Blue (retired), Basic Grey & Basic Black
Papers: Very Vanilla & Basic Black textured cardstock
Other: Butterfly Punch, Dazzling Diamond Glitter, gold brads and hinges, Buckaroo Blue re-inker and mini-misters.

I think I'm inspired to do another layout!!

Scrapping the Bridge

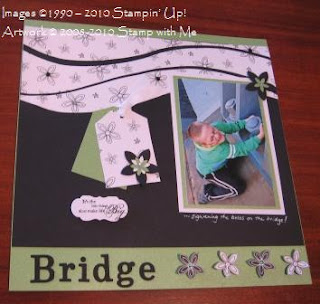
One of the projects we made over the weekend, was the layout inspired by and instructed by Trudy (even if she kept insisting that she wasn't wearing a teacher's hat!!).  Using the same layout design, we chose our own colours and went to work.  This is what they all looked like:


(My layout is right at the top and I've turned the original design upside down!!)

Now I can show you the finished project!  It's amazing what photos, some journalling and a few stamped focal points can do!


This project was jazzed up with a few Stampin' Up! products too, mainly Big Shot items from the SU Autumn-Winter mini catalogue (I'm so loving this catalogue!!).  The SU products I have used are:

Big Shot: Stampin' Up! Timeless Type Junior Alphabet & Stampin' Up! Lots of Tags dies
Punches: 5-petal punch & Spring Blossom Punch (retired)
Stamps: Happiness Always (retired)
Ink: Basic Grey & Signo White Gel Ink pen

Editors Note!
I've just been advised by my WH that my journalling is incorrect.  Apparently Luke is trying to UNDO the bolts on the bridge, not tighten them up!!  Oh well, best go add some more journalling!! 

May is Scrapbooking Month!

Celebrate May! The month of Scrapbooking!


Contact me to see how you can use your Stampin' Up! products to make fabulous scrapbook pages!

Did you know Stampin' Up! have the perfect range of colours, papers, embellishments and more for your scrapbooking needs?  See for yourself:

  • Easy Colour Coordination!  SU provides many products in our exclusive colours, so you can easily coordinate card stock, ink, ribbon, patterned paper, buttons, brads, glitter, hardware and more. 
  • Scrapbooking safe products!  We know scrapbookers want their pages to last, so we created the Stampin' Memories line of products with them in mind. Our card stock is acid and lignin free, so it won't damage pictures. And our albums and page protectors are also perfectly safe for storing your priceless photographs. Not only that, but we provide Craft ink: a thicker, longer-lasting pigment that works wonderfully in scrapbooks.
  • Beautiful Papers!  Stampin' Up! 12" x 12" Designer Series papers feature exclusive patterns printed on both sides. They coordinate beautifully with our card stock, ink, and accessories; plus, they can be trimmed to be used in any size scrapbook. They are also acid and lignin free.
  • Simply Scrappin' Kits make scrapbooking a cinch! They come complete with coordinating self-adhesive die cuts, patterned paper, and card stock. Your scrapbookers will love how easily their pages come together with these kits.
Products Scrapbookers Will Love:
  • Necessities
    • Card stock
    • Designer Series paper
    • Simply Scrappin' Kits
    • Paper Cutter
    • Linen Post and Ring Albums
    • Page Protectors
    • Adhesives
    • Paper Snips
    • Color Coach
  • Stamp sets
    • Alphabet sets (for page titles and journaling)
    • Mini alphabet sets (for journaling and page accents)
    • Background sets (for creating quick and easy backgrounds)
    • Word and greeting sets (for journaling and page accents)
    • Sets in the 'Elements' section of the catalogue (for quick and easy page accents and borders)
    • Wheels (for creating backgrounds, borders, or patterned paper in a snap) 
    • Sets that coordinate perfectly with our punches (for creating page accents)
    • Sets in the 'Holidays' and 'Occasions' sections of the catalogue (for pages about special occasions and holidays)
  • Perfect Page Accents
    • Punches
    • Rub-Ons
    • Ribbon
    • Buttons
    • Clips
    • Hodgepodge Hardware
    • Pretties Kit
    • Brads
    • On Board Chipboard
    • Crafters' Tool Kit
    • Crop-A-Dile
  • Storage Solutions
    • Stampin' Stack & Store Caddy
    • Stampin' Store Containers
    • Forget-Me-Not Keeper (for storing and organizing photographs)

Casing the Catalogue

I am SO in love with the new Vintage Vogue stamp set in the Autumn/Winter Mini Catalogue.  I never thought I would be into the vintage style, but it's so lovely.  I even went to the local patchwork/quilting store and bought me some vintage style lace.  Might be a new addiction!!


Anyways, as using this new stamp set is very new to me, I turned to the Autumn/Winter Mini Catalogue for some inspiration!

To see the gorgeous catalogue for yourself, click on this link and you can download a PDF version and see the gorgeous pic's for youself!

And I decided to use the gorgeous scrap layout for myself.  This layout is an 8 1/2" x 8 1/2" layout which is the perfect size for a standard sized photo.  I'm now challenging myself to take it to the next level and step it up to a 12" x 12" layout!  But for now, I'll show you my version of the Vintage Vogue layout as cased from Stampin' Up!


I'm never quite sure how taking a photo of a photo will look, but I think you can get the general idea!!  I'm the one on the very right hand side, and no we weren't dressing up as pirates (which my WH thought).  Our mission was to wear white top, jeans and a bandana somewhere!  The photo was taken in 2006 in Perth with a group of some of my dearest friends!

Here's what I used:

Stamps: Vintage Vogue
Inks: So Saffron, Soft Suede and Old Olive
Papers: Whisper White, Baja Breeze & Old Olive CS
Other: 1" circle punch, silver brads, Soft Suede polka-dot ribbon, So Saffron button, crochet thread, and Stampin' Dimensionals.

I hope you enjoyed!  Check back soon to see how I made this a central feature of my 12" x 12" page!

Scrapbooking Nature

Another scrapbooking project I finished over the weekend is this one.  I actually finished the layout a few weeks ago, but didn't know what photos to use with it.  While tidying up over the weekend, I found my pictures I had taken during a Digital Camera/Photography course.  All of these photos were favourites of mine, take with the macro function on the camera.  It's amazing the detail you can capture, once you know how!!


There are only two colours of cardstock used in these layouts - Very Vanilla and Taken with Teal.  Cool huh!


I used to be the biggest Chocolate Chip - aholic fan, but now I have been converted to Close to Cocoa.  I've used Close to Cocoa ink for both the stamping and the sponging. 

Here's what I used:

Stamps: Embrace Life, Artfully Asian & the dragonfly stamp (a freebie I got from a magazine years ago)
Papers: Very Vanilla & Taken with Teal CS
Inks: Close to Cocoa
Other: Twinkling H2Os (emerald), rhinestones & Stampin' Dimensionals

And yes, if you're wondering, this layout is what inspired my February calendar page and the layout design was generously given to me by my friend Trudy :o)

An Easter Scrap Layout

Last Friday night (at our monthly scrap night), I started my Easter 2009 scrap layout.  I struggled and struggled for a while, but finally over the weekend I was able to pull it together and finish my two page layout.  Well, almost finished ... I still need to do my title.  Must pull out my Cricut, dust it off and give it a whirl! 


Disregarding my Dutch tablecloth in the background, you can see my totally handmade layout.  Both pages have clouds sponged with Bashful Blue using a scallop circle as a template.  I made my fence with Close to Cocoa CS and used my Weathered stamp & Close to Cocoa ink to give the fence posts 'texture'.


I wanted to combine my Easter layout with the feeling of Spring colour and Easter images.  Quite funny actually, seeing as Easter falls in Autumn here in Australia!!

I'm not sure if you can see my butterflies punched from Almost Amethyst DSP and highlighted with glitter.  The detail of the punch is amazing!!  So here's a closer look:


  Now I'll try and remember what I used (there's a fair bit!!):

Stamps: Chocolate Bunny, A Good Egg & Eggcroutements
Inks: Close to Cocoa, Bashful Blue, Certainly Celery, Pixie Pink & Lavender Lace
Papers: Whisper White, Pretty in Pink, So Saffron, Certainly Celery, Almost Amethyst, Old Olive & Close to Cocoa CS and Tea Party DSP
Punches: SU Scallop Edge, Butterfly & 1" circle & Detailed Butterfly (non-SU)
Other: Rhinestones, Pearls, Ribbon, Glitter, Paper Flowers, Stampin' Dimensionals, Sponge, White Signo Gel ink pen, Big Shot* & SU Little Leaves Die*

*Big Shot and Stampin' Up! Exclusive Dies will be available in the Autumn-Winter Mini Catalogue from Stampin' Up!.  Both will be available from 1 April 2010

Memories ... are made of moments

This year, I have made a real effort to do some scrapbooking. I find it a really difficult thing to do, but have set my New Years Resolution to do a double layout each month. So far I'm on track!!

Last Sunday I sat down and found all my scrap layouts and put them in an album. Believe you me, that was a task on it's own - I had them everywhere!! So having assembled the album, I decided I needed to do a front page to set the theme. And that was made easier by a scrap layout I saw in one of my magazines I had lying around. I wish I could show you the original idea, but other than the layout sketch and the colours, the rest of the idea is pretty much mine. Intrigued? Here it is:


So what did I use? Well my new circle scissors for starters. It was the first time I had used them, and I can't believe how easy it was!! Don't know what was holding me back!

Stamps: None (LOL)
Papers: Purely Pomegranate CS (retired), Blue Bajou CS (retired) & Whisper White CS and Baja Breeze DSP
Other: SU Flower punches (assorted), Scallop Circle punch, Eyelet border punch, buttons, brads, crochet thread and Purely Pomegranate ribbon.

I used my friend's Sizzix for the main word (Memories) and the rest of the sentiment is printed from my computer!

Coincidentally this layout is almost similar to the sketch challenge from Just Add Ink, so I might submit it there (which will be the first time I've put myself out there) but never too late to start I guess!!

Here are the next two....

Following the beachy theme, I also created two more really quick scrap pages. Without photos, they're not quite complete but you will see what I'm trying to achieve. My plan is to matt photos with some coordinating blue and brown cardstocks!!


Once again I've used the matching papers and the stamped images (I've fallen in love with them!). This time they have a strip of printed vellum and lots of room for photos. Mental note ... ask my husband to get the computer down from the roof storage!!

To add a bit of interest, I've added some photo corners cut with Stampin' Up! punch!

I'm not sure if you can tell, but I've used my crop-a-dile to set a copper coloured eyelet in the centre of the large frangipanis. I've also used So Saffron & Baja Breeze ink to colour the flowers. A bit of glitter and Stampin' Dimensionals, and they're done!

Here's what I used:

Stamps: SU Natural Beauty (retired) & frangipanis (from my collection)
Papers: Vanilla & Brown cardstock, patterned papers and vellum
Inks: SU Basic Brown, So Saffron and Baja Breeze
Other: Eyelets, Kindy Glitz & SU Photo Corners Punch


Finally .... some more scrappin' pictures to show!

I've finally finished a few Scrap pages that made over the weekend with a friend of mine. I haven't put the photos in (minor computer glitch - my Fiji photos are on the computer stored safely in the roof!!). These ideas came from some pages my friend was demonstrating, but we both added our own touches to make them a little bit different and unique!


This first pages represents the sea with the sandy coloured paper and the ocean blue paper. I've used printed vellum at the top and added some stamped images matted with matching cardstock. Only the shells and dream stamped images are Stampin' Up! products - the rest is from my private stash (and yes, it's very big!!).


The second page has a mini-scrap book attached to it with room for more photos (when I get them!!). This time I've ribbon on the book and distressed the edges of the stamped squares and the book. Of course, all Stampin' Up! stamps as well as the ribbon!

If you're curious to know what Stampin' Up! products and sets I've used, here they are:

Stamps: Life's a Breeze, Crab & Company (retired) & Natural Beauty (retired)
Ribbon: Chocolate Chip Grosgrain

A Sunny Layout!

Do you remember the card I made other day with the bright yellow card base (click here to see) and the little flower stamped in Rose Red?? Well, I loved it so much I used it as the inspiration for my double scrap-layout!! I am so pleased myself. This one just came together without too much stress (a big thing for me) and was just perfect for some of my Floriade photos!!

I put a little extra effort into the embellishments, to try and convey the bright colours of Floriade and the really happy afternoon we had!! Do you know what I mean???

Sunny Layout Page 1


Stamps:
Garden Whimsy and Garden Friend

Papers: Yoyo Yellow, Green Galore and Whisper White CS
Inks: Rose Red, Yoyo Yellow and Green Galore
Other: Rhinestones (for bling!), scallop edge punch, white taffeta ribbon and Stampin' Dimensionals

This page features the grass which I made with two pieces of Green Galore CS and snipped many times with my paper snips. I have stamped all over the Yoyo Yellow CS with Yoyo Yellow ink and made flowers with rhinestones!! I love my bling!

Sunny Layout Page 2


Stamps: Garden Whimsy and Garden Friend
Papers: Yoyo Yellow, Green Galore and Whisper White CS
Inks: Rose Red, Yoyo Yellow and Green Galore
Other: Rhinestones (for bling!), scrap of blue ribbon, Certainly Celery poly-twill ribbon and Stampin' Dimensionals

This page is rather special! I have used the "free" ribbon I got from SU for placing an order over $100 this month for grass and ruffled it by sewing a gathering stitch for the width of the page. Stick it down onto sticky strip, so it stays there. I have made lots more flowers and coloured some in with rhinestones as well as using the white gel ink pen. My journalling is also with the white gel ink pen, except for the journal tag hidden behind the picture. You may have also noticed, that I have pierced a hole in each scallop along the photo mat.

Anyway, I'm really proud of this one and hope to develop my scrapping skills from there!

200 posts!

Golly golly gosh. I've officially made 200 posts on this blog. I never realised I had that much to say!!

It was a lovely spring weekend. Cleaning on Saturday (much easier in a new house, even if it is bigger), shopping, baking and crafting. The boys played outside and enjoyed the sunny spring weather too!

Sunday, the weather was sunny but windy. But that's okay! I was inside doing the Fresh Cuts Tote & Notes workshops. I will show you our lovely results later this week, when I have a chance to take a pic in the daylight!!

So instead, I'm going to show a couple of my projects over the last week. This scrap layout is one I enjoyed with Trudy on our Monthly Craft Night. I think it's called the Interactive Seahorse Scrap Layout. And it is rather interactive, the sea horse moves. He's been carefully positioned on acetate and a brad to help him move up and down!!


This second page, allows for more photos and journalling. Unfortunately I didn't have any photos with a beach theme. I better go to the shop and get some printed!! I have really cute ones of Luke at Fiji. No beach here in Canberra.

If you're wondering what I used, well .....

Stamps - Seahorse, shells, waves, all from Kaszazz
Inks: Marigold Morning (retired) & Brocade Blue, and reinkers, all from Stampin' Up
Papers: SU Whisper White CS, Bazill CS (blue, yellow and tan)
Other: Dazzling Diamonds, mini-misters, adhesive, chalks

The seahorse was stamped on Whisper White CS with gold, and then coloured in with chalks. The background of the paper was misted/sprayed with a combination of water and a few drops of Marigold Morning or Brocade Blue re-inkers. We also misted with a combination of water and Dazzling Diamonds.

Maybe it's the spring air, but I've been doing more unpacking of boxes and I found this absolutely gorgeously cute birthday card for Matthew.


Don't you love it? It was made by his Nana Cheryl. His little sign moves too. I should start thinking of a card for his second birthday!!

Anyway, I'm off to Sydney for a couple of days (work-related). See you when I get back!!

A double Scrap Layout

Can you believe it is almost the end of winter with spring only one more sleep away!! Just makes you want to get out and explore, be inspired and create!

However, my dose of reality checking reminded me I had an assignment to submit today, so I've spent the last week studying as hard as I could (minus the numerous moments of distraction!).

But a big Hooray! I got my assignment finished on time and it's given me a couple of hours to finish my double scrap layout (that I started at our last Scrap night) and finish addressing all those invites for my WH's 40th birthday. Only a small window before I have to go and pick up the kids and think about dinner!!

Absolutely and positively Inspired by this lovely layout I saw on the Flutterbyes and Fireflies blogspot (click here for the layout and a chance for blog candy), I thought to myself, I could do something with this. I find scrapbooking so hard, but with the layout in mind, these pictures of my Big Boy Luke, some army camouflage colours, I knew I might just be able to put it together! Here they are!


Stamps: Forest Friends & Alphabet (unknown)
Papers: Night of Navy, Kraft, Wild Wasabi (retired) & River Rock (retired)
Inks: Chocolate Chip, Basic Grey & Sahara Sand
Other: Circle Punches, paper piercing tools, white gel pen, crochet thread, navy grosgrain ribbon, cutters & Stampin' Dimensionals. Tag punch from Creative Memories.

You might notice some of the tags are "hidden" behind the photos. I asked my son to write his name and a few other things. I can now treasure the memory of the beautifully innocent, but oh so special, handwriting of a 6 year old, who made it special for his mum!

LinkWithin

Blog Widget by LinkWithin
Blogging tips