Showing posts with label Recipes. Show all posts

Sale-A-Brate with More Choices

Sale-A-Brate with More Choices!

The Sale A Bration party keeps getting better and better with our third release, which includes a fabulous new Level 1 item—our Painted Seasons Designer Series Paper*!


We are also now making some of our regular products earnable as Sale A Bration rewards. This is a perfect time to finish Sale A Bration 2019 with a bang!


Contact me for any information xx

Christmas Stars

So Merry Christmas.  My Christmas wish for you, is to enjoy every happy moment, cherish the memories and surround yourself with the ones you love.

 So today's share is a Christmas yummy for you.  I made little honey star biscuits (a recipe I found at one of my MOPs (Mother's Group) craft sessions.  It was so yummy and I had to try and remember how to make it for myself!


Of course, if you don't have time to ice your biscuits (I did, but the kids ate them too fast!!) a nice little dusting of icing sugar will do.


I packaged my star biscuits into a little glass preserving jar.  Added a belly band of Hessian Ribbon, Cherry Cobbler Seam Binding and a string of stars punched from Gold Foil card.


Of course, I can't leave you without a little recipe.  I hope you enjoy as much as my kids and I did!

Merry Christmas to you and your family xx

Honey Biscuits:
Ingredients
60g butter
1/2 cup of honey plus 2 tablespoons (approx. 140g)
3/4 cup plain flour
 
1/3 cup self raising flour 
1/2 teaspoon bi carb soda

Instructions
  1. Place butter, honey and vanilla into a small saucepan.
  2. Melt in a saucepan over a medium heat on the stove, stirring continuously.
  3. Remove saucepan from stove. Add remaining ingredients and mix with a wooden spoon until combined.
  4. Preheat oven to 180 degrees. Line large baking trays with baking paper.
  5. Once dough is slightly cooled and easy to work with, roll out into a thin rectangle about 2mm in thickness.  Use your favourite cookie cutters to cut shapes form dough.
  6. Bake in oven for approximately 5-8 minutes or so.  Length of cooking time depends on the thickness of your dough.
  7. Store in an airtight container for up to two weeks. 
Click here for Inspiration for this recipe.

Eat Cake

So the other week I had my catalogue launch for the bran-spanking new Stampin' Up! catalogue.  Well we've had school holidays since then, which means I've not had much of a chance to show off some of our projects made for the launch.  Both my friend (and demonstrator) Emma made a few projects highlighting the new Mosaic Madness bundle as well as a few other things.

And of course, with a launch, I always offer nibbles and a glass of bubbly or two.  And coffee of course!  So I had lot of fun with my washi tape when preparing for the launch!

I made tiny little tags with Washi tape.  They are so cute and so easy to make.  All you need is a tooth pick and washi tape!  Wrap the washi tape around the toothpick and cut into shape.  Any sort of shape.  I made mine into flags!


These flags use the Washi tape from the This and That range.  I love the Calypso Coral tape!


And of course, I pulled out the also very new stamp - Sketched Birthday - and made a little banner too.  Says it all really: Eat Cake!


And in case you're wondering, the recipe for this yummy cake (I doubled the recipe) was:

Vanilla fudge slice

Ingredients

60g butter
1 cup brown sugar
1 egg
3/4 cup plain flour
1/2 tsp baking powder
1/2 tsp salt
2 tsp Queen Organic Vanilla Bean Paste
80g butter
2/3 cup icing sugar
1 tsp Queen Organic Vanilla Bean Paste

Method

Step 1 Preheat oven to 160C fan-forced and grease and line a 15cm square baking tin so that the paper extends over the sides to form handles (to help remove the finished slice from the tin).
Step 2 In a small saucepan, melt the butter over medium heat then remove from the heat, transfer to a medium bowl and leave to cool for 10 minutes.
Step 3 Add the sugar, egg, flour baking powder, salt and vanilla and stir through until the mixture is smooth.
Step 4 Spread the batter into the prepared tin and bake for 20-25 minutes. Remove from tin to cool completely before icing.
Step 5 To make the icing, beat all the ingredients together in the bowl of an electric mixer until light and fluffy.
Step 6 Spread on top of the cooled slice.

Recipe located at: http://www.queen.com.au/kitchen/vanilla-fudge-slice

10th Day of Christmas

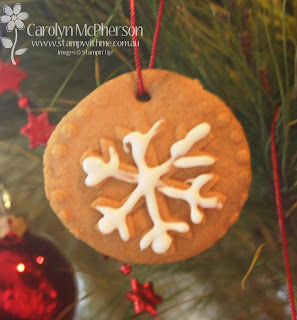
On the 10th Day of Christmas, my Stampin' Up! demonstrator gave to me ..... Christmas Cookies!!

I love to cook at Christmas, especially Christmas baking.  And making biscuits with the kids is a great Christmas activity to share.  So I combined a gingerbread recipe with Stampin' Up!s Sweet Pressed Cookie Stamps!


 My kids love to press the stamps into the biscuit dough.  We used a straw to make the holes and waited anxiously for them to cool so we could start the icing!!


While my kids and I are certainly no experts in icing with fine detail, we had a lot of fun trying and licking the sticky spoons afterwards!!


We used a bit of red cord to hang our biscuits on the tree .... we're a traditional sort of family.  But I'm guessing they won't stay their long.  My kids love these biscuits, as the gingerbread biscuit recipe is fairly mild!!

Ingredients:
  • 150g butter, chopped
  • 1/2 cup firmly packed dark brown sugar
  • 1/2 cup honey
  • 1 teaspoon bicarbonate of soda, sifted
  • 1 egg, lightly beaten
  • 1 tablespoon ground ginger, sifted
  • 1 teaspoon mixed spice, sifted
  • 1/2 teaspoon baking powder, sifted
  • 3 cups plain flour, sifted
  • milk chocolate bits, to decorate

Royal icing

  • 1 eggwhite
  • 1 1/4 cups pure icing sugar, sifted
  • 1/2 teaspoon lemon juice 
  1. Step 1
    Place butter, sugar and honey in a saucepan over medium heat. Cook, stirring, for 3 minutes or until sugar is dissolved. Bring to the boil. Remove from heat. Stir in bicarbonate of soda. Transfer to a large, heatproof bowl. Cool.
  2. Step 2
    Stir in egg, ginger, mixed spice, baking powder and flour until combined. Divide dough in half. Shape into discs. Cover with plastic wrap. Refrigerate for 1 hour or until firm.
  3. Step 3
    Preheat oven to 180°C/160°C fan-forced. Grease 3 baking trays. Line with baking paper. Roll 1 dough disc between 2 sheets of baking paper until 3mm thick. Using a 7cm gingerbread man cutter, cut shapes from dough, re-rolling dough scraps. Place, 2cm apart, on prepared trays. Repeat with remaining pastry disc.
  4. Step 4
    Bake, 1 tray at a time, for 8 minutes or until just firm to touch. Stand on trays for 5 minutes. Transfer to a wire rack to cool completely.
  5. Step 5
    Make icing: Using a fork, beat egg white in a bowl until foamy. Gradually beat in icing sugar until combined. Stir in lemon juice. Spoon icing into a snap-lock bag. Snip off 1 corner. Decorate gingerbread men with icing and chocolate bits. Set aside for 20 minutes or until set. Serve.
Recipe source: http://www.taste.com.au/recipes/21346/gingerbread+men 


SU Regional Swaps

Saturday (yesterday) was the Stampin' Up! Regionals for SU demonstrators located here in Canberra.  My WH graciously gave me another 'day off' from 'home duties' - so Jessica and I headed to the National Convention Centre here in Canberra.  It was a bit strange at first, there was a big disaster medical convention on (boring) so luckily I worked out that we had to go upstairs and that's where the fun begins!!

It's always a great opportunity to catch up with stamping friends, both old and new.  See some wonderful demonstrations of both new and old products as well as time for stamping.  Yep, stamping at the Convention Centre.  Much more interesting then medical disasters (LOL!!).

Another fantastic experience is 'swapping' with other SU girls.  It's such a great way to see how others use products and stamps, and always unique, individual and different to your own!!  I decided to do something different this year.  I did some baking and then some decorating.  I have very black stained hands to show!!


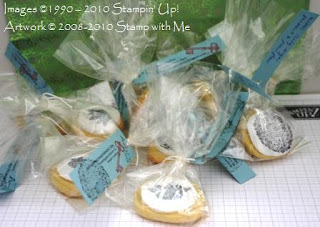
OK, that's one vanilla butter biscuit, iced and stamped with one of the Artistic Etchings stamps (my favourite set).  I then did some more:


And of course, you can't give biscuits away just like that.  So I made some tags and put individual bikkies in cello bags.  I had a whole bunch of them:


My biscuit recipe is my own, but here is the 'other stuff ' I used:

Stamps: Artistic Etchings
Papers: Baja Breeze CS
Inks: Poppy Parade, Early Espresso & Buckaroo Blue
Other: Cello bags and crochet thread

So I hope you enjoyed my 'take' on swaps!

Homemade Goodies!

Can you believe it's Sunday night already?

And even more so - Can you believe yet another weekend has gone by? No wonder we are counting down to Christmas so fast - 7 weeks to go! I have updated my Countdown to Christmas page - be sure to check it out if you love the Christmas colours of the Poinsettias!
One of the things I love about Christmas - (and believe me there are so many!) is all the home baking and homemade treats. This weekend I tried a new recipe: Brown Sugar Meringues. They are so easy - yet taste so different from "normal" meringues! Homemade treats in beautifully wrapped packages. Perfect for Christmas!

One of my upcoming Countdown to Christmas projects will feature different wrappings, boxes and gift bags. All you need is a bit of creativity, a dash of inspiration, a handful of 'ingredients' and a lot of love!

Ha Ha! LOL! I know :)

Don't forget too - the Stampin' Up! Special Offers of Stampin' Write™ Markers at individual prices of $4.95 and 20% off their exclusive Rub-Ons start tomorrow. Don't miss out on these offers this month!

Here's the recipe if you're wondering...............

Brown Sugar Meringues:
Ingredients (serves 6)

2 egg whites
1/2 cup brown sugar
1/2 tsp white vinegar

Method:

Preheat oven to 120°C. Cover two oven trays with baking paper and mark with 8cm circles. For meringues, use an electric mixer to beat egg whites to soft peaks. Add 1/4 cup of brown sugar and beat until dissolved. Add rest of sugar and beat until smooth. Gently fold in vinegar and spread to fill the circles. Allow room for spreading. Bake for 1 1/4 - 1 1/2 hours until dry and cooked through. Turn oven off and cool with door ajar. When cool transfer to an airtight container.

LinkWithin

Blog Widget by LinkWithin
Blogging tips