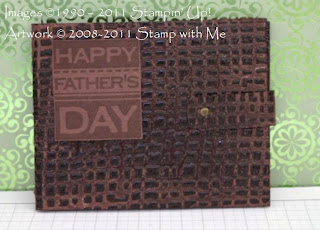
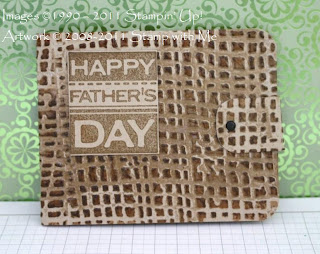
Inspired by some of the projects I've seen made by friends for their dads, well I thought I had better do something myself. So I made both my dad and my husband, a faux leather gift wallet.
The Choc Chip wallet, uses Chocolate Chip CS, and Chocolate Chip, Early Espresso & Cranberry Crisp inks for colouring.
The Crumb Cake wallet, uses Crumb Cake CS, with Crumb Cake and Creamy Caramel inks.
Inside the wallets, it has been designed to hold money, gift vouchers or gift cards. I made up little vouchers for my boys to fill in. So they chose things like breakfast in bed, chocolates, books to be redeemed within the year!
I've decorated my wallets with the Father's Day stamp from the Occasional Greetings set (now retired) and used a scrap piece of faux leather CS to make the leather clip. I've used a corner punch on all the corners too! I've attached one side with a brad and on the back, I've used some scrap pieces of magnet so that the wallet can be opened and closed.
I've used the French Foliage stamp set with the colours of Soft Suede, Pear Pizzazz, Tangerine Tango, Wild Wasabi, Daffodil Delight and Kiwi Kiss to decorate the voucher cards and then stamped the Happy Father's Day sentiment (from Teeny Tiny Sentiments) in Chocolate Chip!
I've used an online tutorial to make the wallet and so that I know how to make it again, the dimensions I used were:
Outer Wallet: 9" x 3 1/2", scored at 4 7/16" and 4 9/16" (faux leather)
Inner Wallet: 8 1/2" x 3 1/4", scored at 4 1/4"
Card Slots: 2 pieces of 4 3/16" x 2" and 2 pieces of 4 3/16" x 1" (faux leather).
So that you can put money in the wallet (we didn't), only use glue or sticky strip along the bottom of the inner wallet piece.
For the card slots, use glue or sticky strip along the two sides and the bottom only, so that you can insert your cards.
Other tips from the tutorial, leave a small gap towards the centre of the card slots so that the wallet can fold without bunching.
I've also followed an online tutorial for faux leather, so my quick steps for my own future reference:
1. Dry emboss cardstock with the Big Shot and an Embossing Folder - I used the Jim Holtz burlap EF.
2. Dab your ink pads all over the embossed CS until you have the colour effect you like. Allow to thoroughly dry.
3. Dab a VersaMark inkpad all over the embossed CS and sprinkle all over with clear embossing powder.
4. Use a heat tool all over the CS until the embossing powder is melted.
To see the wallet that inspired me in the first place, head on over to the blog of Debbie P.
Wow! This was a long blog post for me. I had better go and make sure my wonderful husband has a great day with us and then ring my dad (he lives in Melbourne) and wish him a Happy Father's Day too. I love you both xx


No comments:
Post a Comment